


The holidays are almost upon us and everything is buzzing. It's my busiest time of year, business-wise, and happily this year I had the chance to stock up on hats in preparation. So, although my usual production / wait time on hat orders is about four weeks, many of the items currently in my Etsy shop are now available for immediate shipment. For others that are out of stock, I might still be able to whip one up in time for delivery by Christmas, if you act fast.
See something you like? Just write to me to ask about availability.
Thursday, December 15, 2011
Monday, December 12, 2011
Close-ups of the 'Drake' Trim
This just in: photos of the ribbon trim on my 'Drake' fedoras. Several layers of triangle-folded and dagged ribbon are secured with vintage mother of pearl buttons. Shown here in five standard colors.


Navy Blue with Blue / Gray Trim


Black with Black Trim


Chocolate Brown with Rust Trim


Red with Black Trim


Loden Green with Gray / Green Trim


All of these color combinations are for sale now in my Etsy store. Custom colors available upon request.
How to Wear a Small Hat
Small hats, those less-than-full-size confections, go by many names: cocktail hats, fascinators, minis, etc. They are festive additions to outfits for the holidays, weddings, special events, etc., and they're a bit different than full size hats. Here's some advice about how to wear them with panache.
Step One. First Thing's First: Choosing the Hat for You. Just like with other clothing, it's important to think about size, color, shape, etc. when choosing a hat. The same hat worn by different people, with differently shaped faces, can look quite different. Proportion is especially important. The smaller the person (and/or the head and face), the smaller the hat that can be worn and still look in proportion. But an average or larger person will probably look best in a slighter larger mini hat. That's why I offer two sizes of small hats- a mini and a 'midi', to give my customers more options. Customers who visit my studio can try on hats to their heart's content until they find the right one, and I also assist online customers to find the best hat choice for them through email.
Step Two. A Bit of Practice: Find the Sweet Spot. Now that you've got the hat of your dreams, it's time to figure out how to wear it. If you just pop a mini on top of your head, it will probably look tacked on, it's important to place it carefully so it's flattering to your face. Most hats look better worn slightly off-center, at an angle, and/or tipped forward partially onto the forehead, and this is especially true for small hats. In my product photography, I've placed the hat on the mannequin head in a suggested position for wear, but everyone is different so you'll need to find the right angle for you. In front of a mirror, try it on in various positions on your head, until you find one that looks good. Feel free to play around and try different things! Although I put a label on the sweatband inside at the 'intended' center back of the hat, there is no 'right' way to wear it, only what looks best to you.

Take the hat off and flip it over to view its underside. Notice whether or not there is an elastic band and where the combs are, if any, then put it back on the sweet spot, and make a mental note of the approximate spots where the combs are on your head.
Step Three. Now the Hard Part, Made Easy: How Does a Small Hat Stay on Your Head? Unlike a full size hat, a small hat does not encompass and grip onto your whole head, so it needs some extra help to stay in place. All of my small hats come equipped with a thin elastic band, a ribbon to tie the hat on under your chin, or combs, or a combination of these.

Combs are also very useful, especially when your hairstyle doesn't allow for use of elastic, or for taller hats, like toppers, that need extra security. For very small cocktail hats that have only one comb, gently pull the ends of the comb away from the hat base and then, starting just above the hat's 'sweet spot' (see Step Two), slide them down into your hair until the hat is in the desired position. As long as the flat end of the comb is facing upward and the ends of the comb are facing down, gravity will help hold it in place. For hats that have one comb at each side, you'll see that these are usually sewn into the hat facing upward. To insert them into your hair, first flip one comb downward with the ends facing your head, press the ends into your hair at its intended spot (see Step Two), swirl the comb around into your hair in a circle or two (to get a good grip on the hair), then turn the comb back upward and push the flat end of the comb (the end sewn to the sweatband) back in toward the center/top of your head so that the comb is completely hidden again under the hat. Then, do the same on the other side with the second comb. If it feels too tight or pulls your hair uncomfortably, try it again with less swirl. If it's still loose, swirl more and start the swirl a little bit farther out from the center of the hat. For extra grip, I often use both combs and elastic. If you would like to use the combs without the elastic, just tuck the elastic away behind the sweatband inside the hat so that it won't hang down and show when the hat is worn.
For a hat that is tall or has tall feathers, you may want to prepare your hair as described above but then wait until you've reached your destination to put on the hat, to avoid damage by bumping up against the top of low-ceilinged vehicles.

Step One. First Thing's First: Choosing the Hat for You. Just like with other clothing, it's important to think about size, color, shape, etc. when choosing a hat. The same hat worn by different people, with differently shaped faces, can look quite different. Proportion is especially important. The smaller the person (and/or the head and face), the smaller the hat that can be worn and still look in proportion. But an average or larger person will probably look best in a slighter larger mini hat. That's why I offer two sizes of small hats- a mini and a 'midi', to give my customers more options. Customers who visit my studio can try on hats to their heart's content until they find the right one, and I also assist online customers to find the best hat choice for them through email.
Step Two. A Bit of Practice: Find the Sweet Spot. Now that you've got the hat of your dreams, it's time to figure out how to wear it. If you just pop a mini on top of your head, it will probably look tacked on, it's important to place it carefully so it's flattering to your face. Most hats look better worn slightly off-center, at an angle, and/or tipped forward partially onto the forehead, and this is especially true for small hats. In my product photography, I've placed the hat on the mannequin head in a suggested position for wear, but everyone is different so you'll need to find the right angle for you. In front of a mirror, try it on in various positions on your head, until you find one that looks good. Feel free to play around and try different things! Although I put a label on the sweatband inside at the 'intended' center back of the hat, there is no 'right' way to wear it, only what looks best to you.

Take the hat off and flip it over to view its underside. Notice whether or not there is an elastic band and where the combs are, if any, then put it back on the sweet spot, and make a mental note of the approximate spots where the combs are on your head.
Step Three. Now the Hard Part, Made Easy: How Does a Small Hat Stay on Your Head? Unlike a full size hat, a small hat does not encompass and grip onto your whole head, so it needs some extra help to stay in place. All of my small hats come equipped with a thin elastic band, a ribbon to tie the hat on under your chin, or combs, or a combination of these.

Unlike under-chin ribbons, which are fairly self-explanatory, the elastic is meant to go at the back of your head under your hair. To use it, put the hat on, then pull the elastic gently down in back, pull your hair over it and smooth it down again over the elastic to hide it. If your hair is fine and/or slippery, it's often helpful to give the elastic a little something extra to grab onto by applying a light coat of hairspray to the back of your head or using another texture-adding product. My favorite is Osis+ Dust It by Schwarzkopf, it makes the hair matte but not stiff or sticky. I generally use black rayon-covered elastic bands, but I also offer them in blond, brown, and white, so if you would like one of these other colors, just let me know when you place your order.
I use good-quality, smooth plastic combs that, unlike cheaper plastic or metal combs which often have sharp edges, will not damage your hair or scalp if used properly (i.e. gently). Personally, I have fine, slippery hair, and find that a dash of OSIS+ Dust It hair powder or hairspray plus a small amount of back-combing in the spots where the combs will go helps them to stay in place even better than swirling alone. To back-comb, apply a small amount of hairspray or hair powder on the spot where you want the comb to go. Pick up a 1-2 inch section of hair from that area, pull it out at a right angle from your head, and starting 2-3 inches away from your scalp, comb it gently backward toward your scalp using a small-toothed comb or brush. This will give your comb a little cushion of hair to anchor into. At the end of the day or after your event, I recommend getting the tangles from the back-combing out by gently washing your hair and working them out with conditioner, rather than trying to comb them out dry, to avoid damage.
For custom clients who may be interested, I also have a selection of new and antique hat pins that I would be happy to include in your order upon request, in addition to or instead of combs, elastic, etc. Instructions in the use of hat pins can be found here.
Step Four: Make a Commitment. Sometimes people who would like to wear hats more often tell me that they are reluctant to do so because they're afraid that if they take their hat off during the day or in the middle of an event, they will have messed-up hair, especially with small hats that might leave a flat spot. My response to this is that you should think of your hat as an integral part of your outfit, and commit to wearing it for the duration. You wouldn't take your skirt off during a party (I presume), so why should you remove your hat? Hat etiquette sometimes requires gentlemen to doff their hats (during performances of the National Anthem, at dinner, etc.) but full size hats are less likely to give one asymmetrical 'hat head', so this is less of a problem for the guys.

However, even in circumstances where men are required to remove their hats, ladies are not expected to do so, and rightly so, given the extra effort than goes into securing a small hat to your head.
The right hat can be the focal point for your whole outfit, and once it's on securely, you can enjoy yourself without thinking much more about it beyond feeling fabulous. It may take a couple of tries to get the hang of placing your hat and using combs, but once you do, you can wear your small hats with confidence that they won't fall off or slip around. Any customer who would like further instruction in how to wear them is welcome to come by my studio for a free lesson, just ask for an appointment.
Sunday, December 11, 2011
Making a Name Change
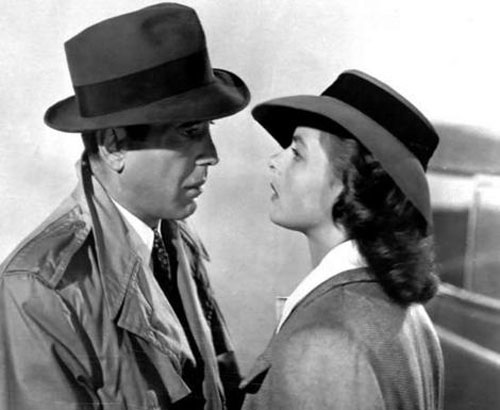
After posting yesterday about my new casual ladies hats, I was taking a good, long look at pictures of this hat worn by Ingrid Bergman in the classic movie 1942 'Casablanca' with Humphrey Bogart.


And I noticed how much it looks like my new style 'Bacall', especially in profile. In the next photo, my hat sits at a slightly different angle on the mannequin head than the hat as worn by Bergman in the previous photos, so my brim appears to dip down more at the side than Berman's hat does, but they actually have a very similar arc and shape.

The crown is almost identical, as is the front of the brim, although Bergman's brim seems to be marginally larger all around. The back of the brim on my hat is a bit shorter, and of course I've flipped it up in back, but I tried flipping it down, and then the similarity in shape was even more pronounced.


I found it interesting to notice that my hats are almost always photographed from slightly above so you can see as much of the hat as possible, whereas Bergman seems to have been shot mostly from slightly below while wearing this hat, to better show her beautiful face.


I cobbled the 'Bacall' together from two antique, hand-carved hat blocks (a separate crown and brim) from that period (1930s or 1940s), but I got the blocks from different sources at different times, so they didn't come together as a set. And I wasn't even thinking about 'Casablanca' specifically when I designed the hat, just a general feeling of Hollywood glamour from the time. But, with all the time I've spent watching classic movies, clearly this famous hat must have been lodged somewhere in my subconcious, waiting to spring out.
In light of this, I think I have to re-name this hat the 'Bergman' in honor of her. I'm changing the name everywhere shortly, including in my previous blog post, to avoid confusion.
Saturday, December 10, 2011
Gift Certificates
Want to give the gift of House of Nines, but unsure what to get? Don't know your giftee's hat size, or just want to surprise them? No problem. I offer gift certificates good toward the purchase of any House of Nines Design product or custom order.


The paper gift certificate is printed with the amount of your gift, and redemption instructions. There are several Etsy listings for gift certificates in various amounts; if you want a different amount, just let me know and I'll create a special listing for you. It comes wrapped inside a miniature box (4x4x4") that looks just like my full size hat / gift boxes, with a hand-decorated mini felt hat to keep, so it's more 'gifty' than just giving a slip of paper. Please let me know your choice of a mini top hat or mini fedora when you place the order.
If you'd like me to send this item directly to the giftee, please contact me with their address when you place the order. Also, I'd be happy to enclose a card or letter from you if you like, just contact me for my mailing address so I'll know to wait on sending the package until your card arrives.
Happy Holidays!
New Styles: Some Casuals
In addition to all the fancy frippery I've been concocting lately, I've created a few more casual ladies styles for everyday wear. These were all inspired by 'sport' hats popular in the 1930s and 1940s, and famously worn with flair by Golden Age Hollywood starlets. I made them using rare, hand-carved antique blocks from my collection.


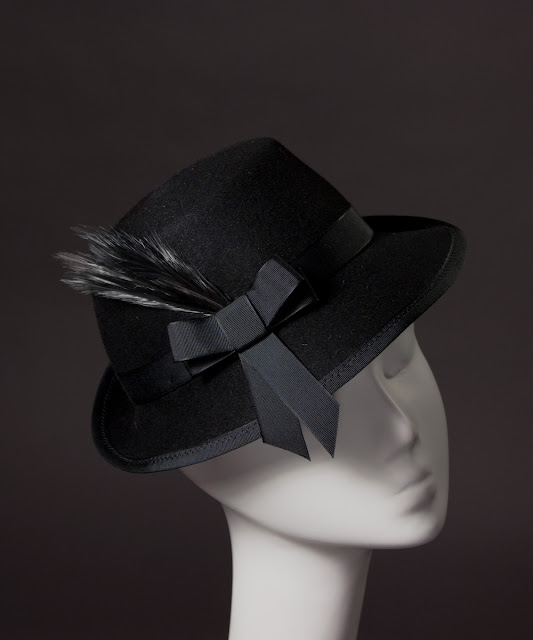
The 'Bergman', shown here in black velvety velour-finish fur felt, is shaped something like a soft, feminine fedora or porkpie. The brim is wide enough to offer sun protection, but the lush material and fancy ribbonwork make it glamorous enough to wear day or night.


I rarely leave the house without a hat on and the 'Alex' is one of my all-time go-to favorites. I've made it in a number of different versions during the last few years, but this one, in polished fur felt with a small bow and spray of feathers, feels just right. Simple, comfortable and easy to wear, but distinctive.


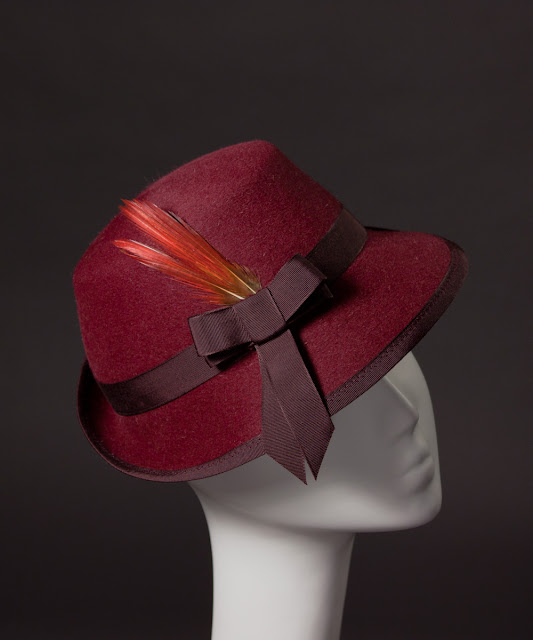


The 'Jean' is from my midi range (more than a mini, a little smaller than full size). I couldn't resist giving this petite, soft porkpie a bit of extra glamour by adding a big spray of silky ostrich feathers, but the feathers can be easily removed from the trim for a less frothy look. This one was made in a warm medium brown velvety velour fur felt with steel gray ribbon and feathers.


All of these hats perch slightly forward on the head at a jaunty angle and can be worn by a range of sizes. They are all now listed in my Etsy shop, but as usual, any of these hats could be made in any number of other color combinations upon request. Interested in a custom color? Just ask.
Ingrid Bergman with Humphrey Bogart

Jean Harlow

The 'Bergman', shown here in black velvety velour-finish fur felt, is shaped something like a soft, feminine fedora or porkpie. The brim is wide enough to offer sun protection, but the lush material and fancy ribbonwork make it glamorous enough to wear day or night.


I rarely leave the house without a hat on and the 'Alex' is one of my all-time go-to favorites. I've made it in a number of different versions during the last few years, but this one, in polished fur felt with a small bow and spray of feathers, feels just right. Simple, comfortable and easy to wear, but distinctive.


The 'Jean' is from my midi range (more than a mini, a little smaller than full size). I couldn't resist giving this petite, soft porkpie a bit of extra glamour by adding a big spray of silky ostrich feathers, but the feathers can be easily removed from the trim for a less frothy look. This one was made in a warm medium brown velvety velour fur felt with steel gray ribbon and feathers.


All of these hats perch slightly forward on the head at a jaunty angle and can be worn by a range of sizes. They are all now listed in my Etsy shop, but as usual, any of these hats could be made in any number of other color combinations upon request. Interested in a custom color? Just ask.
Customer Question: A Bit About Blocks
I was recently asked about my hat shapes by a customer, who noticed that my mine are different from other hats they've seen on the market. There's a good reason for that: mine are different, and here's why.
Except for a few hand-draped pieces, all of my hats are made using hat blocks. A hat block is a mold made of wood that you stretch felt over to create the shape of the hat. If you'd like a better idea of how this works, see this great video made at the Stephen Jones Millinery workshop. They are using two layers of fabric material instead of felt, but otherwise it's a very similar process to how I use my blocks.
I like this video because, although the process has been edited down from many hours to just a few minutes for illustration, in watching it you can get an idea of all the laborious hand work that goes into making a single hat.
As you can see in the video, the resulting hat is the exact size and shape of the blocks. So, except in the case of draped hats (in which the felt is sculpted by hand like clay, instead of stretched over a block for shaping), a separate block is required for each shape and size to be made. For example, in order to offer a full range of adult sizes for sized hats, as many as eight (or more) blocks are needed in different sizes but an identical shape, and that only creates that one style. More styles require further sets of blocks. In practice, most hats require two blocks for each size, one for the crown (the top of the hat), and another for the brim. As you can imagine, this adds up, and if you're inclined to collect them, blocks can easily take up a lot of storage space and tools budget. But because I want to offer my customers unique styles that cannot be purchased from other hat makers, I've made collecting carefully designed, skillfully made unique blocks a priority for my business.
Over the past few years I've amassed an extensive collection of blocks. Although most of the blocks available on the market are standard, rather generic shapes available to any hat maker, with very few exceptions, all of the block shapes I use are one-of-a-kind and not to be found elsewhere. A few of my blocks are unusual, hand-carved antiques that I've found here and there, and therefore unique because of their scarcity, but most were custom made exclusively for me by Guy Morse Brown Hat Blocks in the UK. Their ever-expanding catalog of standard styles has many interesting shapes, and their quality and craftsmanship is top-notch. Over the past few years, I've commissioned many original block designs from GMB, they do an incredible job of bringing my ideas to life, I can't recommend them highly enough to anyone interested in buying blocks from their catalog or as custom pieces.
Thursday, December 8, 2011
Midi Range: The 'Marlene' Top Hat
Here is another shape for my new 'midi' size- not as small as a mini hat, but just smaller than a full size hat. While it looks closer to a full size hat when worn, it perches jauntily on the head so you can also have a hairdo, and sizing is not an issue. They're one-size-fits-all, and more flattering to most of us than the minis, which can sometimes appear to be a bit too small in proportion to the face.
As you may have noticed, I generally name my blocks (and the resulting hat shape). I also sometimes name individual styles made with those blocks, for those that have particularly distinctive trim. For example, the 'Una' style (big bow in back, ruffled hat band and curly feathers with antique silk lace veiling) is made with a 'Belle Epoch' mini top hat block, but I make other styles with the same block as well.
The following hats were made using the same midi size block, which I call the 'Marlene', after Dietrich, who often rakishly wore a top hat and lady tux.

The block is modeled on a classic 1900-era top hat shape, called a D'Orsay, that had a gently belled crown and an curly brim.
The first style I'm calling 'Viola'. Here's one in lush leopard print long-napped fur felt, with a large bow and hand-curled feathers. These Ringneck Pheasant feathers are overdyed to match the felt, leaving the feathers' natural markings and iridescence still showing through.


The 'Marlene' hats have actually been in the works for a while now, but I had an especially difficult time settling on a trim, as I wanted something that would compliment the shape of the hat without obscuring it on one hand, or being too plain on the other. After weeks and weeks of fussing, inspiration for the trim finally came unexpectedly from my hat block maker...
Guy Morse Brown Hat Blocks makes spectacular blocks. I can't say enough good things about them, or about Owen Morse Brown, the current owner and head block maker there. He's an incredibly talented woodworker, and makes fine musical instruments in addition to hat blocks. He recently sent me the following amazing photos of a viol he made for one of his instrument clients.


I especially love the scrolls on some of his other work, like this one.

See more of Owen's work as a luthier here.
The 'Viola' is now available for sale in my Etsy shop.
And here's a sneak peek at the first finished sample from a line of over-the-top hats I've been dreaming up. These will definitely fall into the 'More Is More' category, and are going to include beaded and button-covered hats, rhinestone-encrusted hats, etc. I'm even planning to make a small coral reef from manipulated fabric and ribbon... Most of them will have themes.
Made from long-napped felt shaped with the 'Marlene' block, this top hat style is inspired by and named for Maman Brigitte, a New Orleans Voodoo loa. It's draped with several feet of distressed vintage silk veiling wound around the hat and tied into a large bow on the back; the loops of the bow are supported by long antique hat pins that stick up from the back of the hat. Two hand-curled Lady Amherst Pheasant tail feathers are tucked behind the bow. On the front, it's also got hat pins that I made specially for this style, using bone skull beads and fish vertebrae, small spotted and striped feathers, and a small horsehair whip. A spray of wispy black peacock hurl feathers, and a wishbone tied with a red ribbon bow, completes the design.


As you may have noticed, I generally name my blocks (and the resulting hat shape). I also sometimes name individual styles made with those blocks, for those that have particularly distinctive trim. For example, the 'Una' style (big bow in back, ruffled hat band and curly feathers with antique silk lace veiling) is made with a 'Belle Epoch' mini top hat block, but I make other styles with the same block as well.
The following hats were made using the same midi size block, which I call the 'Marlene', after Dietrich, who often rakishly wore a top hat and lady tux.

The block is modeled on a classic 1900-era top hat shape, called a D'Orsay, that had a gently belled crown and an curly brim.
The first style I'm calling 'Viola'. Here's one in lush leopard print long-napped fur felt, with a large bow and hand-curled feathers. These Ringneck Pheasant feathers are overdyed to match the felt, leaving the feathers' natural markings and iridescence still showing through.


And here's a 'Viola' in basic black. It could be made in lots of colors. Have an idea for a custom color? Let me know.


Guy Morse Brown Hat Blocks makes spectacular blocks. I can't say enough good things about them, or about Owen Morse Brown, the current owner and head block maker there. He's an incredibly talented woodworker, and makes fine musical instruments in addition to hat blocks. He recently sent me the following amazing photos of a viol he made for one of his instrument clients.


I especially love the scrolls on some of his other work, like this one.

See more of Owen's work as a luthier here.
The 'Viola' is now available for sale in my Etsy shop.
And here's a sneak peek at the first finished sample from a line of over-the-top hats I've been dreaming up. These will definitely fall into the 'More Is More' category, and are going to include beaded and button-covered hats, rhinestone-encrusted hats, etc. I'm even planning to make a small coral reef from manipulated fabric and ribbon... Most of them will have themes.
Made from long-napped felt shaped with the 'Marlene' block, this top hat style is inspired by and named for Maman Brigitte, a New Orleans Voodoo loa. It's draped with several feet of distressed vintage silk veiling wound around the hat and tied into a large bow on the back; the loops of the bow are supported by long antique hat pins that stick up from the back of the hat. Two hand-curled Lady Amherst Pheasant tail feathers are tucked behind the bow. On the front, it's also got hat pins that I made specially for this style, using bone skull beads and fish vertebrae, small spotted and striped feathers, and a small horsehair whip. A spray of wispy black peacock hurl feathers, and a wishbone tied with a red ribbon bow, completes the design.


Subscribe to:
Posts (Atom)